
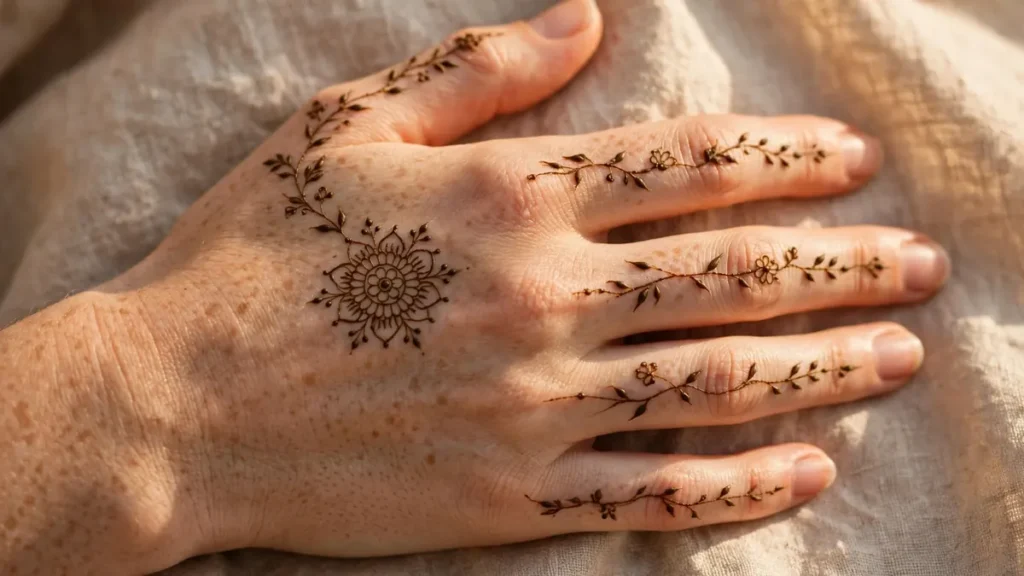
Mehndi has always been part of celebrations in South Asia, but not every occasion calls for dense, full-hand work that takes hours to apply and dry. Sometimes the most beautiful choice is the simplest one: a small mandala on the palm, a fine vine trailing across the fingers, or a single floral motif on the back of the hand. Simple mehndi designs suit everyday wear, office days, small family gatherings and last-minute festivals, and they are far easier to apply at home, even with little practice.
This article focuses only on simple designs — not bridal work, and not heavy, full-arm patterns. For broader henna patterns for festive occasions, that companion article covers richer, more elaborate styles, while the designs here stay light, quick and easy to wear.
Answer: What Are the Best Simple Mehndi Designs?
The best simple mehndi designs use one clear motif and plenty of empty space: a minimal mandala on the palm, a single vine across the fingers, a floral cluster on the back of the hand, or an Arabic-style trail from wrist to finger. Keep lines clean, leave skin showing between motifs, and let the design dry for a deeper stain.
What Makes a Mehndi Design Look Simple and Elegant?
Simplicity in mehndi is about restraint. A design with one focal motif, balanced spacing and clean lines looks refined, while a design crowded with competing motifs looks busy even when the drawing is skilled. Empty space is part of the design: it lets each flower, dot and vine breathe, and it makes the henna stain look intentional rather than accidental.
Line quality matters more than complexity. Steady, even lines — drawn slowly, with consistent cone pressure — elevate even the simplest flower. Wobbly, rushed lines do the opposite. If you are new to applying henna, practise on paper first: draw the same flower, mandala and vine ten times, and you will feel your hand steady before the cone ever touches skin.
Colour also plays a role. Natural henna stains in shades from orange-brown to deep reddish-brown, deepening over the first day or two. Avoid cones marketed with instant black colour, which often contain added chemicals that can irritate skin; a patch test on the inner arm, done a day before a big event, is a sensible precaution for sensitive skin.
Which Simple Mehndi Designs Suit the Front Hand?
The front hand, or palm side, offers a broad, flat canvas, so a central motif works beautifully. A minimal mandala is the classic choice: start with a small circle in the centre of the palm, add one ring of petals, then a ring of dots or tiny leaves, and stop. Resist the urge to fill every gap — a mandala with breathing room looks modern and intentional.
A second front-hand favourite is the single-flower design. Place one medium flower near the base of the thumb or the centre of the palm, extend a short curved vine toward the wrist, and add a few leaves and dots along it. The rest of the palm stays bare, which suits everyday wear and pairs well with rings and bracelets.
For a slightly fuller look without heaviness, try a half-palm floral swirl: a flower near the thumb, a curved line sweeping across half the palm, and small leaves trailing off. This design photographs well, dries faster than full-hand work, and still reads as a complete, finished pattern. The HealthFlock easy henna patterns show several such palm layouts step by step, which helps when you are choosing between a mandala, a single flower and a swirl.
What Are the Easiest Finger Mehndi Designs?
Finger designs are the quickest route to a polished look, and they suit people who want henna without covering the whole hand. The simplest approach is a vine: draw a thin curved line along one side of a finger, add tiny leaves at intervals, and finish with a dot at the fingertip. Repeat on two or three fingers, and leave the others bare for contrast.
Ring-style finger designs are another elegant option. A band of small dots or a tiny flower around the base of a finger reads like jewellery and works beautifully for office wear or small gatherings. For a playful variation, add a small heart, star or crescent moon on one fingertip, keeping the remaining fingers plain.
When decorating fingers, work from the little finger inward, so your hand does not smudge finished work as you move. Keep the cone tip fine and the pressure light; thick, heavy lines on fingers look clumsy, while fine lines look delicate. If a line goes wrong, a damp cotton bud corrects it immediately, before the paste dries.
How Do Simple Arabic Mehndi Designs Differ?
Simple Arabic mehndi is known for bold, flowing shapes and generous empty space. Instead of covering the hand, an Arabic trail sweeps diagonally — from the wrist across the back of the hand toward the index finger, for example — with large flowers, leaves and paisley shapes along the way. The open spaces between motifs are deliberate, and they give Arabic designs their airy, modern feel.
To try one, start at the wrist with a medium flower, draw a bold curved vine toward the fingers, and add leaves and a second, smaller flower along the curve. Leave the palm side mostly bare, or add a single small motif on one finger to tie the two sides together. Because Arabic designs use fewer, larger shapes, they are forgiving for people still building confidence with a cone: a slightly imperfect petal still reads as part of a flowing, organic pattern.
The Milan Mantra collection of mehndi patterns includes Arabic-style examples alongside Indian and minimal styles, which makes it easy to compare how much coverage each style uses before you choose.
How Do You Apply Simple Mehndi at Home?
Good preparation makes application far easier. Wash your hands and dry them fully, and skip hand cream beforehand, since oils can weaken the stain. Test the cone on paper: the paste should flow smoothly without dripping. Hold the cone like a pen, resting your hand on a steady surface, and work slowly — speed comes with practice, not with rushing the first attempt.
Let the paste dry undisturbed, which usually takes 30 minutes to a few hours depending on thickness. Once dry, gently scrape the paste off rather than washing it off, and avoid water on the design for several hours afterwards. A dab of lemon-sugar mixture while the paste is drying is a traditional way to deepen the stain, and keeping hands warm afterwards also helps colour develop. The stain is lightest at first and deepens over 24 to 48 hours, so judge the final result on the second day, not the first hour.
For everyday wear, pair your design with the rest of your outfit. neckline styles that balance a festive outfit help the whole look feel coherent, and blouse styles that pair with a festive henna look matter when henna is worn with a saree or lehenga. For a festive home setting, floor patterns for a festive home entrance complete the celebration look, while skin care for dry hands before applying henna keeps hands smooth so lines draw cleanly.
Which Simple Mehndi Designs Suit Everyday Wear?
For daily wear, choose designs that survive handwashing, typing and cooking without looking untidy as they fade. A small mandala on the back of the hand, a single vine on two fingers, or a tiny flower near the wrist all fade gracefully, because they have no dense filled areas that patch unevenly.
Avoid very fine, dense detail for everyday designs: tiny filled shapes fade first and can look blotchy within a day or two. Bold, simple shapes age better. If you apply henna weekly, rotate designs — a mandala one week, a finger vine the next — so no area of skin is repeatedly stained, and each design feels fresh.
Key Takeaways
- Simple mehndi works through restraint: one clear motif, clean lines and plenty of empty space.
- A minimal mandala, a single flower or a finger vine all suit everyday wear and last-minute occasions.
- Arabic-style trails use bold, flowing shapes with open space, and forgive small imperfections.
- Practise on paper, apply slowly with steady pressure, and correct mistakes immediately with a damp cotton bud.
- Let paste dry fully, scrape it off rather than washing, and judge the stain after 24 to 48 hours.
- Natural henna only, with a patch test first, keeps simple designs safe as well as beautiful.
FAQs
How long do simple mehndi designs last?
Simple mehndi usually lasts five to seven days on hands, fading gradually with washing. Designs on the palms, where skin is thicker, often stain darker and last slightly longer than designs on the back of the hand.
How can I make my mehndi stain darker?
Apply natural henna to clean, dry skin, let the paste dry fully, and avoid water for several hours after removing it. Warmth helps colour develop, and the stain deepens naturally over the first day or two.
Are simple mehndi designs suitable for children?
Yes, when kept small and quick, with natural henna only and a patch test first. Tiny flowers, hearts and stars on the back of the hand suit children best, and designs should avoid the face and any broken skin.
Can I apply simple mehndi myself without experience?
Yes. Start with a mandala, a single flower or a finger vine, practise the motif on paper first, and work slowly with a fine-tipped cone. Simple designs are forgiving because they use few shapes and generous empty space.
What should I avoid when applying mehndi?
Avoid cones promising instant black colour, which often contain added chemicals, and avoid applying henna to broken or irritated skin. Skip hand cream before application, and do not wash the design off with water while the paste is still drying.